Monday – San Diego, California
A busy bike day today, so if you don’t like tech talk, you can skip today 🙂 But I do advise to go back and read yesterdays again at the end, I forgot about the Skunk incident, like how could I forget!!! 😕
After brekky it was straight into work, I needed to get both wheels off to take in for tyre changes and I wanted to be in early at the shop. So, using my new tool that I bought off Craig,(a 12mm Allen key, he will get another if he wants one but then, he already has a 12mm socket drive bit and may not need to get another hex key) it was an easy job to crack the seal on the front wheel bolt using a bit of judicious thong leverage while it was still on the ground 🙂 Sorry for the shot of my arse, but it is cute eh 😉


Once that was loose it was on to the back wheel, I have done this quite a few times, it is easy but messy especially with the oil fling off from my chain oiler, as shown by the newest member of the black hand gang 🙂


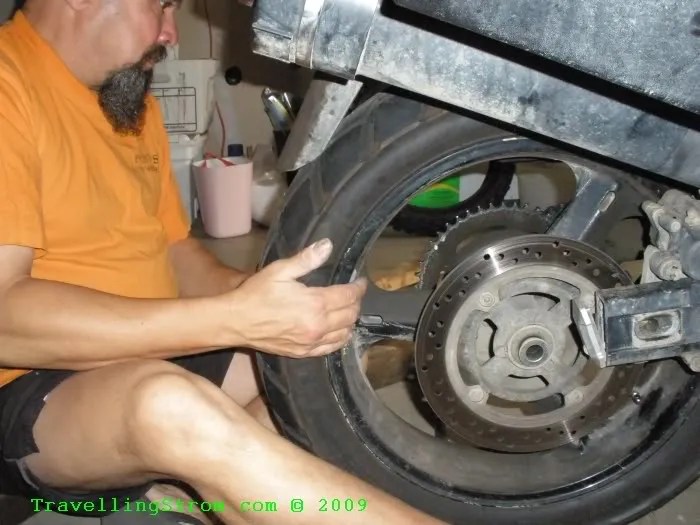
After that it was onto the front wheel, we did not need a stand here, it was on the centre stand, and I added a heavy bag plus two bricks to keep the bike balanced on the wood blocks at the back 🙂 As you can see I have learned from my earlier dirty mistake and donned some rubbers 😉


That was my first attempt at removing a front tyre, so it is good to know how, and it was very easy with the right tool, I wish Suzuki included this in the kit, a very silly thing to leave out imho, you know, one of the things that will get used on a regular basis!! After dropping the wheels and tyres off at the House of Motorcycles for changing, Craig took me for a drive around some of the ‘hood. San Diego is basically a flat town built on a series of canyons, with most of the buildings and houses etc up on the rims and sides and the road system down in the gulley’s. There is a lot of tropical influence like palm trees and colonial type houses with Spanish influence as well.


Even though there are a lot of hill climbs, it is mostly up and down the canyon to get to where you need to go. We found a block of land with a nice view where the house had been removed prior to something else being built; it looked like a nice place to live with a park area down below surrounded by cliff top homes, very nice, it must be a great view at night 🙂


We went back to the shop which was now open, so Craig could look at helmets as he needed to replace his trashed one while I picked up the wheels. I managed to sweet talk them into a discount and both tyres were changed for $40 🙂 On our return to the house, while the rear wheel was out, I changed the rear brake pads which were moderately worn, and cleaned and freed up the calliper assembly which had become a bit stiff.


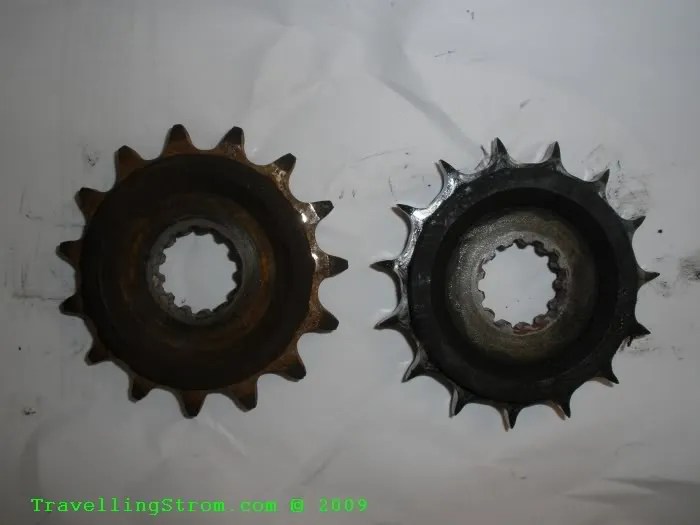
After lunch, once both wheels were in place, it was time to replace the front sprocket, Craig had given me the used one from the wrecked bike, it had only done 9,600 miles and was in real good condition compared to the one I took off, which had only done 12,000 miles. I was really disappointed in this wear, but there was really not much life left in it and the only thing that I can think of that caused this was the extremely large amount of dirt and crud under the front sprocket housing. This was caused by the chain oil fling off and all the dirt I did in Canada and Alaska, so maybe the front sprocket was ground down by this? But this did not explain why the chain was still fine, it had to travel through the same crud, I have no idea why, needless to say, the replacement sprocket should last to the end of the chains life in another 10-12,000 miles, I hope anyway 🙂 The worn one is on the right,(12,000 miles), the one I was given on the left(9,600 miles), as you can see there is a significant difference and I will be sure to inspect the front sprocket area at least once a month from now on.

It was nearly 5pm and now I could relax a bit, the major jobs for the day had been done, so now I could concentrate on incidentals. The first one was the GPS mount which had arrived late this afternoon. This is how my GPS was being held in place, it used an original Garmin marine mount, which fell apart after one week and has been held in place by cables ties ever since 🙂

Number 1 is the cradle, number 2 is the external power cable, number 3 is the marine mount dashboard system and number 4 is the GPS battery weather cover. The 0’s are cable ties, between the 3 of them the thing has been held in place and covered 30,000 miles and it has worked very well, but it has bounced around a lot and caused some scratching on the inside of the windscreen. So, using the new RAM mount kit, it was an easy job to mount it to the existing holes in the dash, hopefully this system will take the rigours of my riding style and road conditions I have been travelling over. The marine one broke after 1 week of normal road, no off road at all!


In this shot we have my new dash layout, the two outside units are now a bit taller as they both have RAM mounts, but I am hoping that will not interfere with my sightline(over the windscreen) too much.

The SPOT mount looks like it will work a treat, I just readjusted the way my lanyard was attached to it so it would pull the unit ‘out’ of the cradle, rather than up, the way it used to be connected. Once again I ‘hope” it will never be tried out but I expect the top plastic clamp to be snapped off if I come off, which is good, or bad, depending on the way you look at it 🙂

The other point about the dash is that at the bottom end of Mexico when I enter Guatemala, the TomTom will be stashed away, no more maps until I get back up north, so I will have a clear view though the centre and I may even remove the bracket as well. That job done, open another beer and start work on the tank bag. Although I had connected it up at Ziggy’s place, I had not mounted the connector as I knew it was a PITA and very fiddley. The tank bag has about 4 different layers, very tough materials to cut through, so making a small hole for a screw, then trying to thread a small screw through 4 different layers which have moved around is a chore, but beer helps 🙂


That job took a bit of time but I got it done in the end 🙂 The next and final task for the day that I decided to do was to add a switch to the ‘Dealer Mode” connector. I had had that FI error (Fuel Injection) up in Alaska which has never come back, so it will be hard to fix, without replacing a part of the bike under the tank which may or may not need replacing. Anyway, I had bought a small switch, Craig had some small gauge wire and I used the existing paper clip to make two small legs which I soldered wire to.

I did not have any real small heat shrink, so I used lekky tape, put both legs into the Dealer Mode connector and replaced the dust cover, trapping the wires between the sides.


Then I ran the wires and the switch around alongside the Gerbing heated clothing cable and outside and also could push this down inside the tankbag strap protector, a very accessible location if I ever need to use it again. If this was my permanent bike, I would have mounted it in a panel mount rocker switch up on the dash somewhere, but it will do me for here and is very easily removable. The reason for the switch is because with the link between the connectors, it uses the dashboard clock display as to show the error codes, and I wanted the clock back 🙂


By the time this had been completed, Lisa had come home from a long a day at the offices and we had a beer, dinner and some more chatting about this that and the other 🙂 Tomorrow I was going for a ride, so Craig showed me on a county map the roads we would have done on Sunday and I could do some or all of this. I also had to go back to Poway Motorcycles on the way to pick up my oil and dust seals for the front forks, just in case I need them, cheap insurance for down south. While there I would get them to recheck my rear sag(of the bike, of the bike!!) as I had now adjusted the shock. It was an early night, I am still behind in the blog, but managing to get at least one out a day, so I am not getting further behind.
I also started to look into the Mexico part of things. I had been in contact with a rider called Gary who lives in Mexico City(the largest city in the world). He had posted on the VSRI forum a while back about hosting riders and showing them around. Margaret(beemerbird) had also mentioned she had stayed there and had a great time, so although I hate big cities on a bike, it may be possible to see this one while using public transport and having a safe place to stay. He had said, sure come on down glad to have you, just take your time plenty to see and do on the way, which now I had seen a map of Mexico, I believed him 🙂
One of the things that did cause me concern is the fact my bike is owned by me, insured for me in my name but is still registered in Tom’s name(the seller). I now find that the paperwork I need should show the registered owner and he has to be present, that could be a big issue further down south, I could get away with just the title deed for Mexico. I would have to make a phone call to Tom tomorrow and see what he can help me with. I had originally been told(not sure who by) I could not transfer the rego into my name as I did not have a USA drivers licence, but at the time I was also out of California, so there were conflicting issues at the time and I was fresh off the boat so to speak 😕 Anyway, that is for another day 🙂
Day 4 miles and 6 km
Trip – 37,365 miles and 60,133 km
Cheers
TravellingStrom
USA Canada
 Mexico